Enabling Oracle Generative AI Agent for OCI Regions
What are Generative AI RAG Agents?
Generative AI Agent is a fully managed service that combines the power of Large Language Models (LLMs) with AI technologies, to create intelligent virtual agents, that can provide accurate, personalized and contextually-relevant responses to end-user queries, and creates a highly engaging customer experiences. The method of augmenting the user requests with private organizational data is called Retrieval Augmented Generation or RAG.
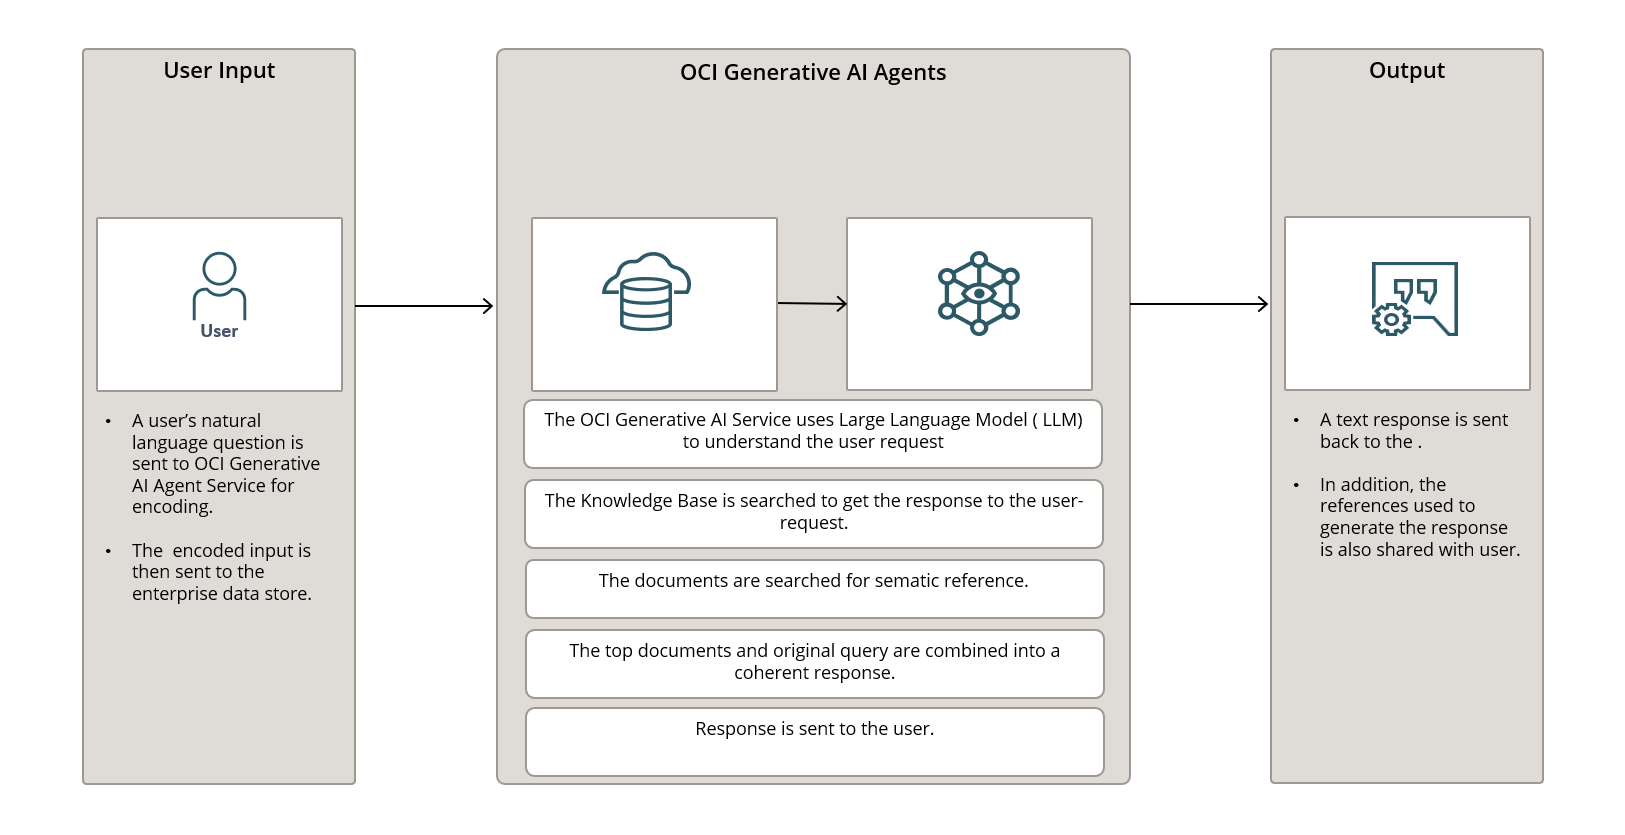
On a very high-level, the following figure describes how the OCI Generative AI Agents work.
We will learn how to create how to Create an Oracle Generative AI RAG Agent. I have broken the post down into 3 parts:
- Enabling Oracle Generative AI Agent for OCI Regions
- Creating a Knowledge Base for creating Oracle Generative AI RAG Agent
- Create Your First Oracle Generative AI RAG Agent
This is the first blog of the series and in this blog we will discuss the necessary pre-requisite steps that you need to complete before you can create your first Oracle Generative AI RAG Agent. These steps would be necessary ONLY IF your tenancy is NOT subscribed to any of the Regions where OCI Generative AI services are available.
If your tenancy is subscribed to any of the Regions where OCI Generative AI services are available, then you DON’T need to perform any of the steps described in this blog. You can refer to the blog Creating a Knowledge Base for creating Oracle Generative AI RAG Agent and start configuring your first Oracle Generative AI RAG Agent .
Check if Oracle Generative AI Agent services are available in OCI
You can access this service through the Oracle Cloud Infrastructure (OCI) Console. So you need to have access to Oracle Cloud Console. For the purpose of this demo, I’m using my Oracle Cloud Free Tier account.
The easiest way to check if you have access to Oracle Generative AI RAG Agent Service is to login to your OCI console and navigate to Analytics & AI > AI Services and see if you can see Generative AI Agents option in the list.
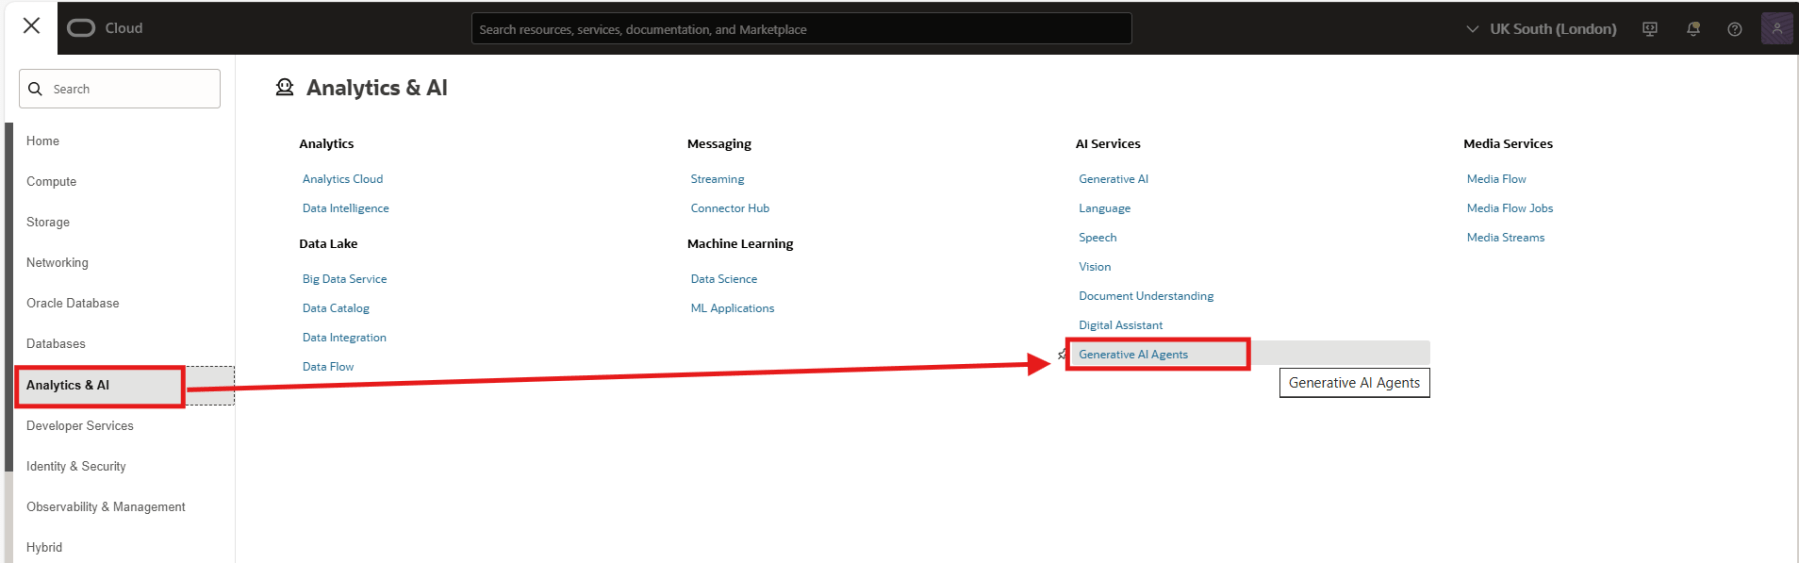
If you DON’T see Generative AI Agents, progress with the steps below.
Select Region
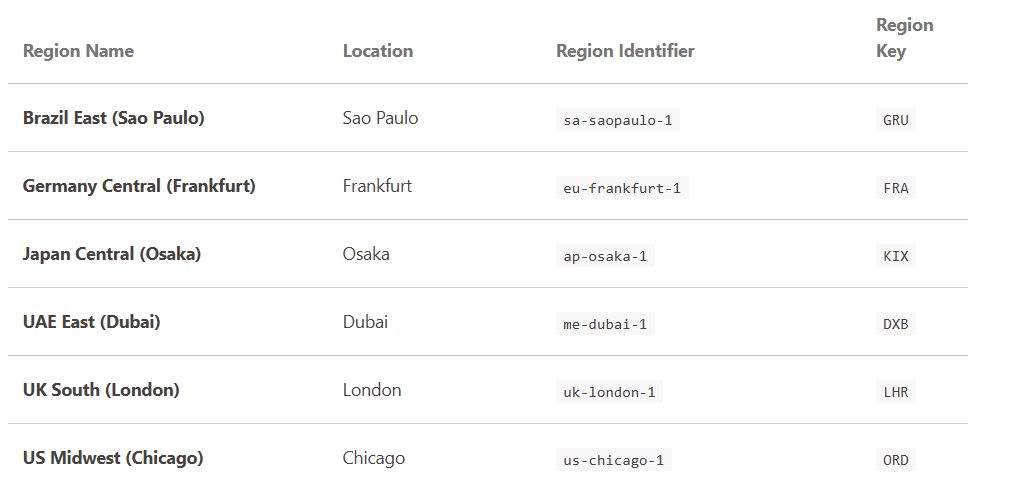
At the time when I’m writing this blog, the Oracle Cloud Infrastructure (OCI) Generative AI Service is not offered in every available OCI commercial region. OCI Generative AI is hosted in the following regions:
If your tenancy is already subscribed to any of the above regions, please skip this step.
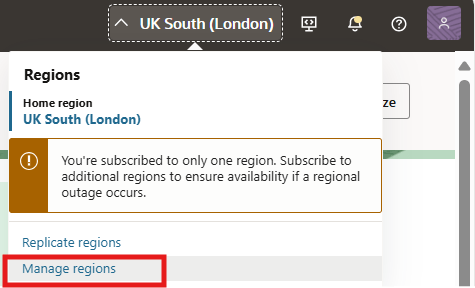
To check the region to which your tenancy is subscribed, login to your OCI Console and click on the Regions drop down on the top-right-hand corner.
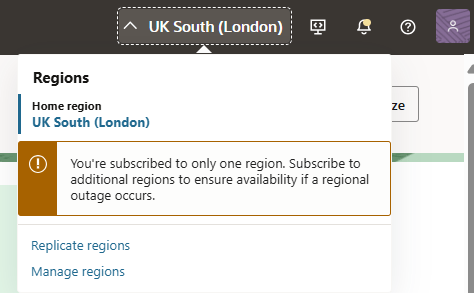
As you can see, the home region for my tenancy is UK South (London). As OCI Generative AI is available for the this region, I can skip the step below.
If your tenancy is NOT subscribed to any of the regions where OCI Generative AI services are available, then click on Manage regions.
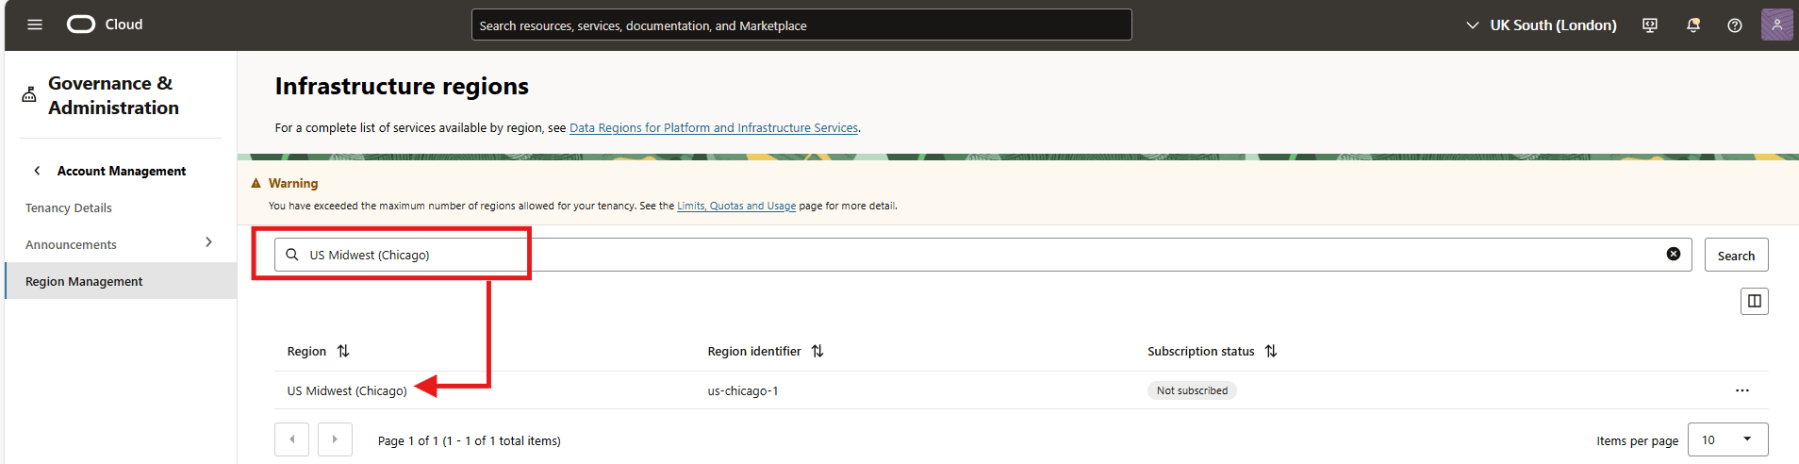
In the Infrastructure regions page, search for a region OCI Generative AI services is available.
Click on the … and then click Subscribe.
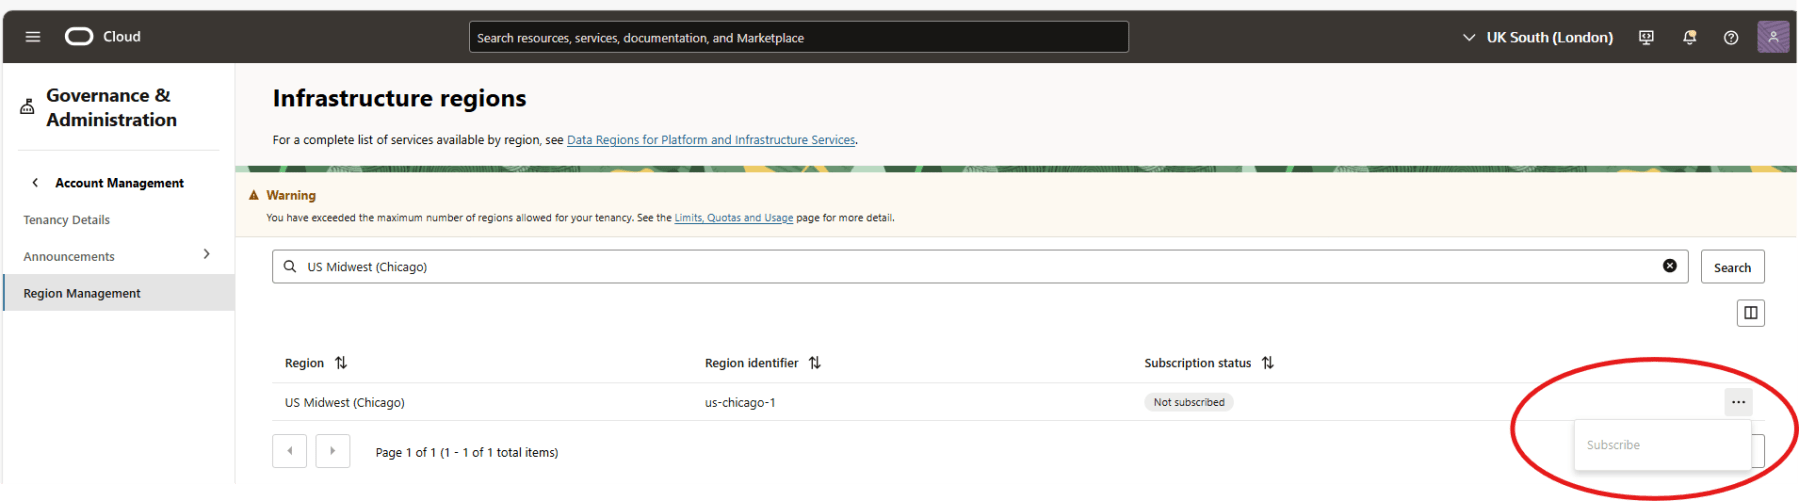
Click the Subscribe button at the bottom of the Subscribe to New Region dialog box. The operation might take a few minutes to complete. When complete, the new region will appear on the Regions drop down menu.
Notes:
- Since I’m using Oracle Free Tier, my tenancy is limited to one subscribed region. Hence the Subscribe option is greyed-out for me.
- When you subscribe to a region, you cannot unsubscribe from it.
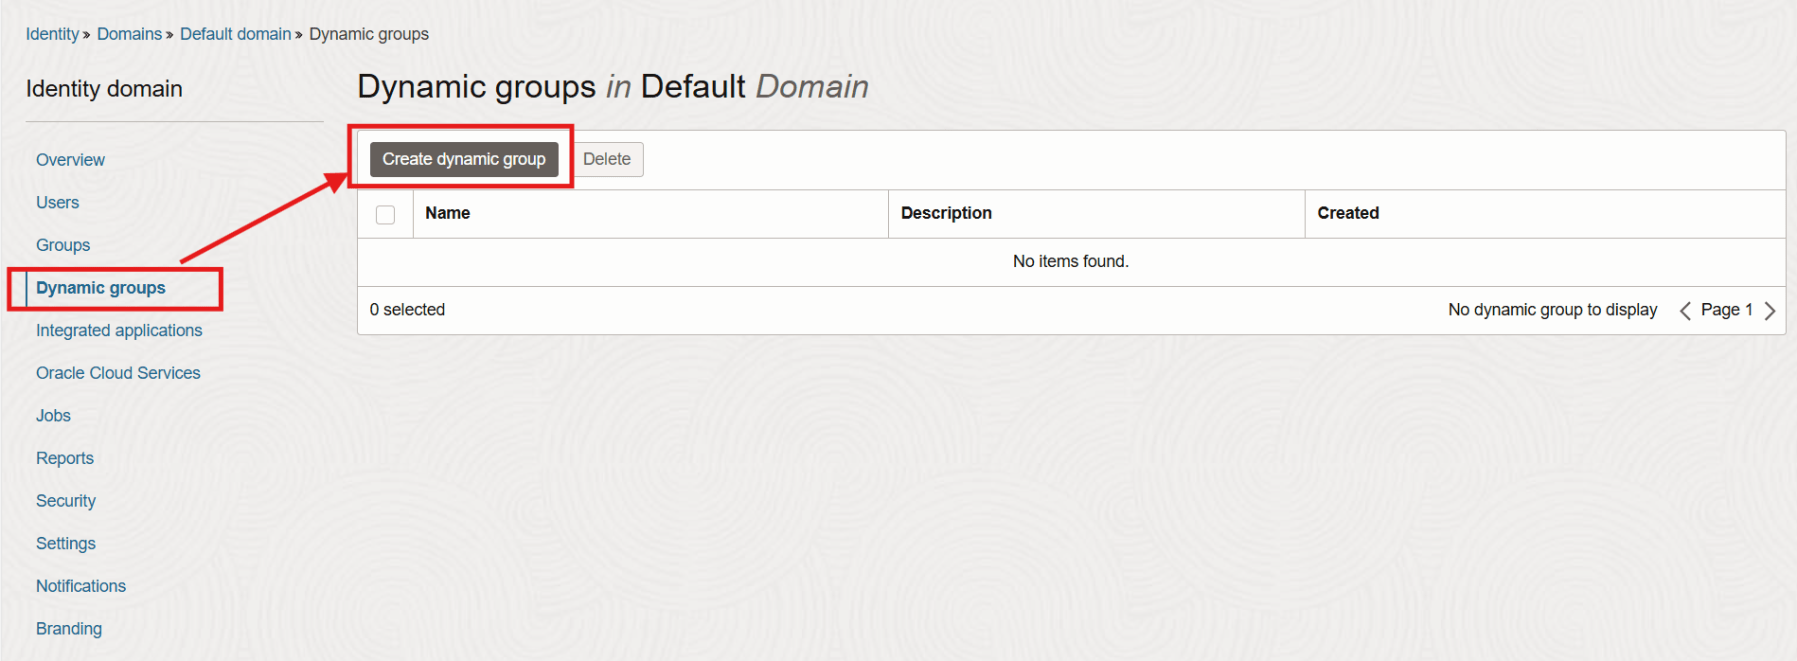
Create Dynamic Group
The next step is to create a Dynamic Group. Dynamic groups allow you to group Oracle Cloud Infrastructure instances as principal actors, similar to user groups. You can then create policies to permit instances in these groups to make API calls against OCI services, in the case the Oracle Generative AI Agent Service. Membership in the group is determined by a set of criteria you define, called matching rules.
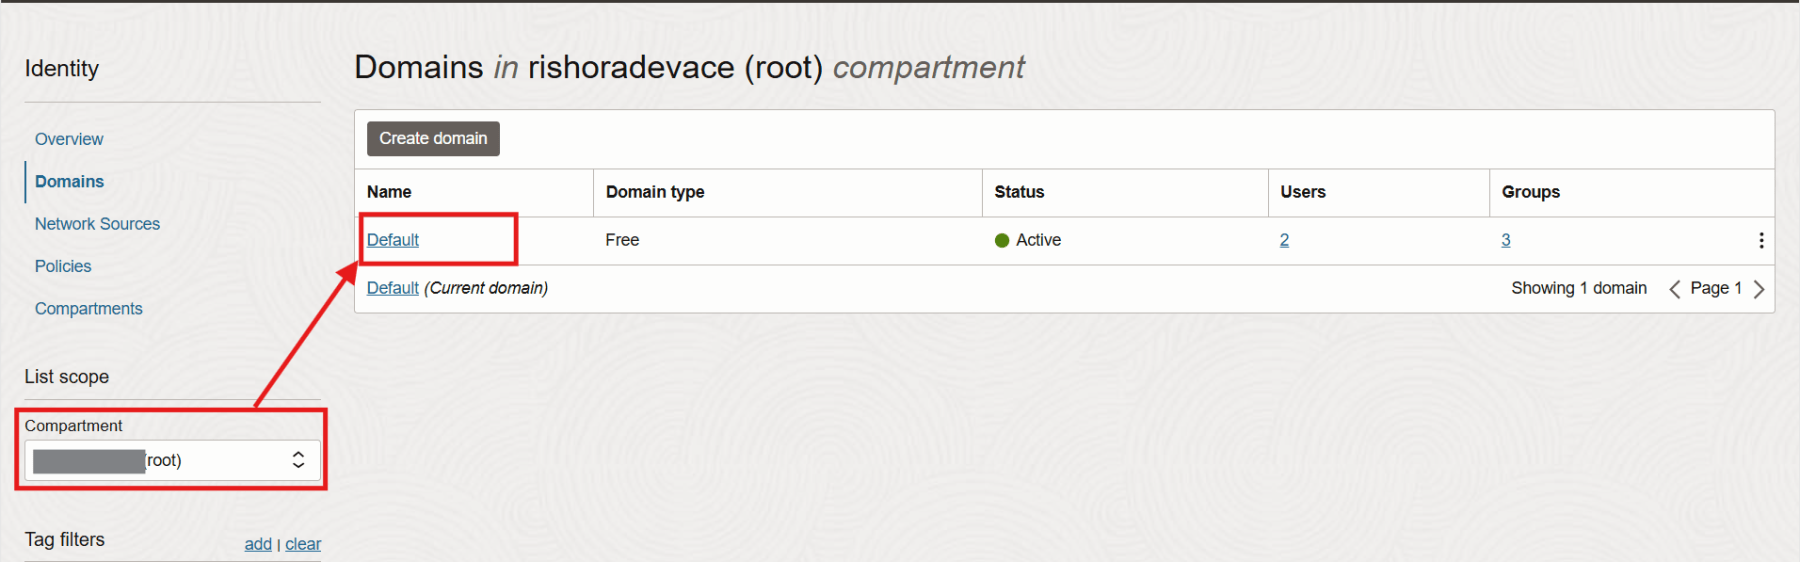
To create a Dynamic Group, from a navigation menu click on Identity & Security > Domains.

Make sure the root compartment is selected. Click on the Default domain.
Click on Dynamic Groups and then click on the Create dynamic group button.
In the Create dynamic group page, provide a valid Name and Description.
In the Matching rules section, select the Match all rules defined below radio button. Under Rule 1, add the following expression:
all {resource.type='genaiagent'}
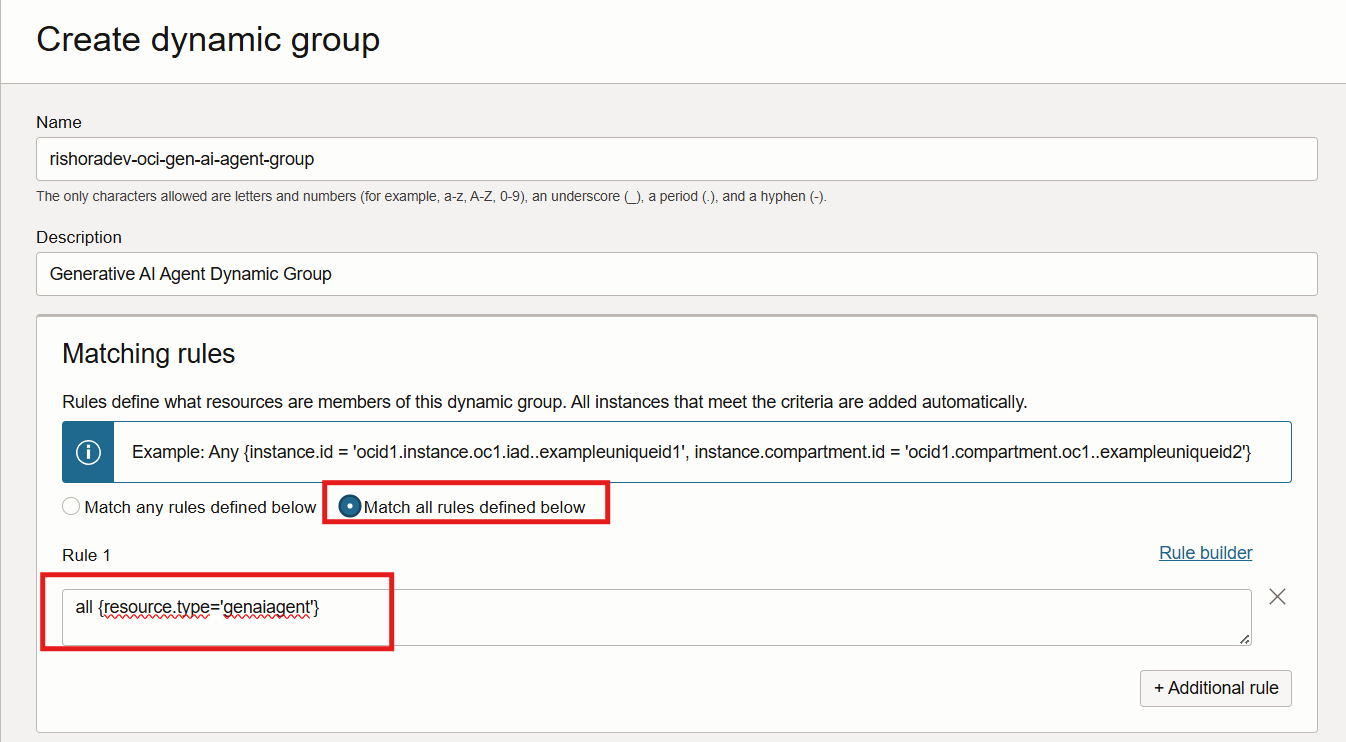
Click on Create.
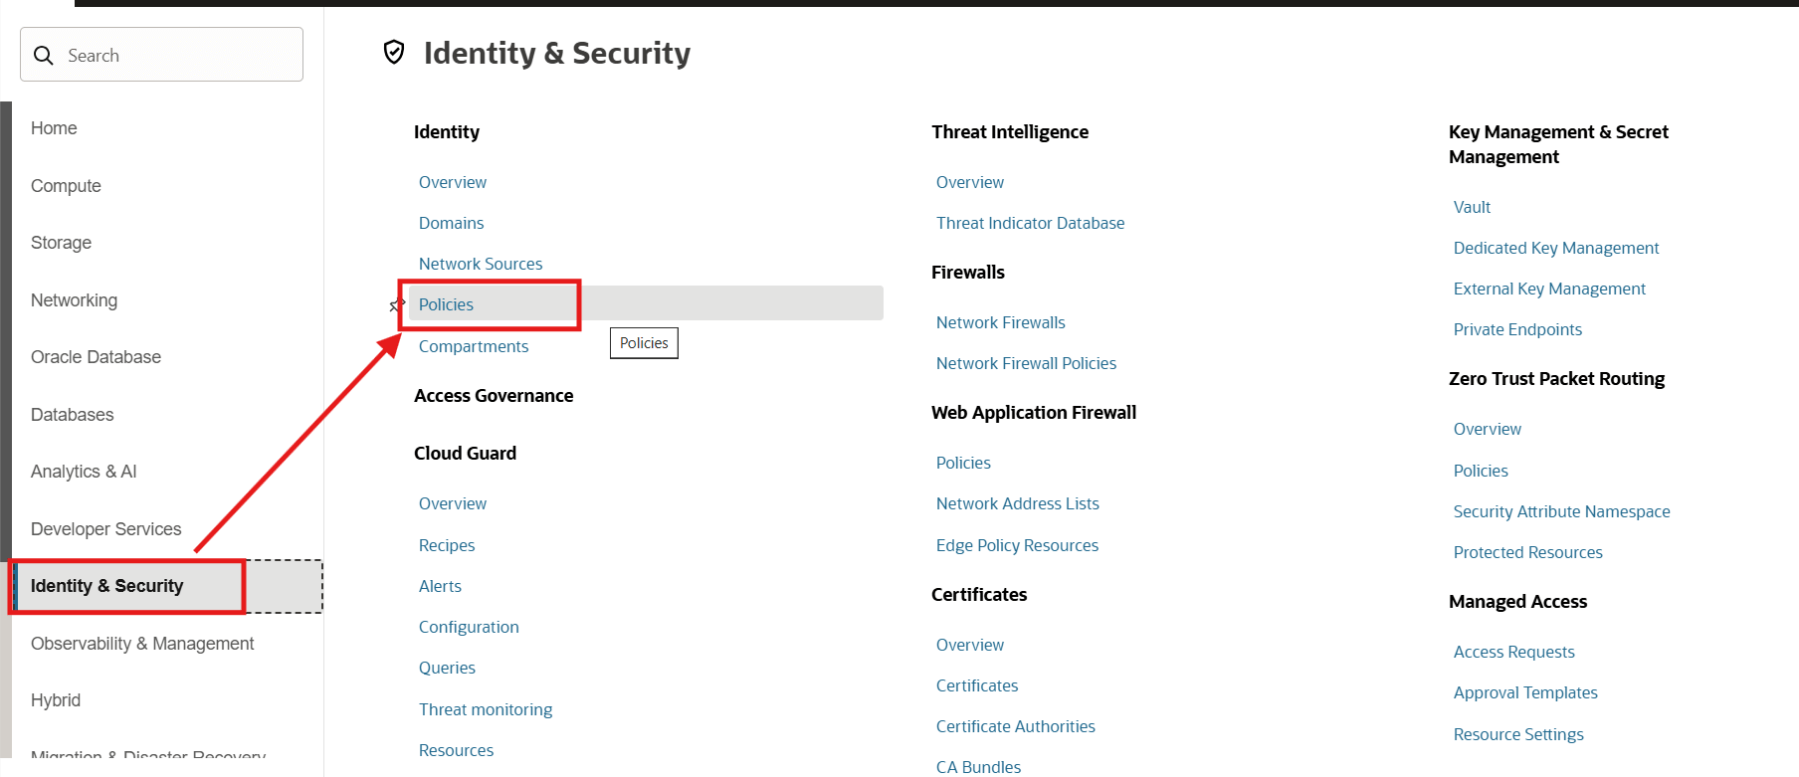
Create Access Policies
Now that the Dynamic Group has been created, we need to define the access policy. To create the Policy, from the navigation menu, click on Identity & Security > Policies.
Under Policies, make sure the root compartment is selected. Click on Create Policy.
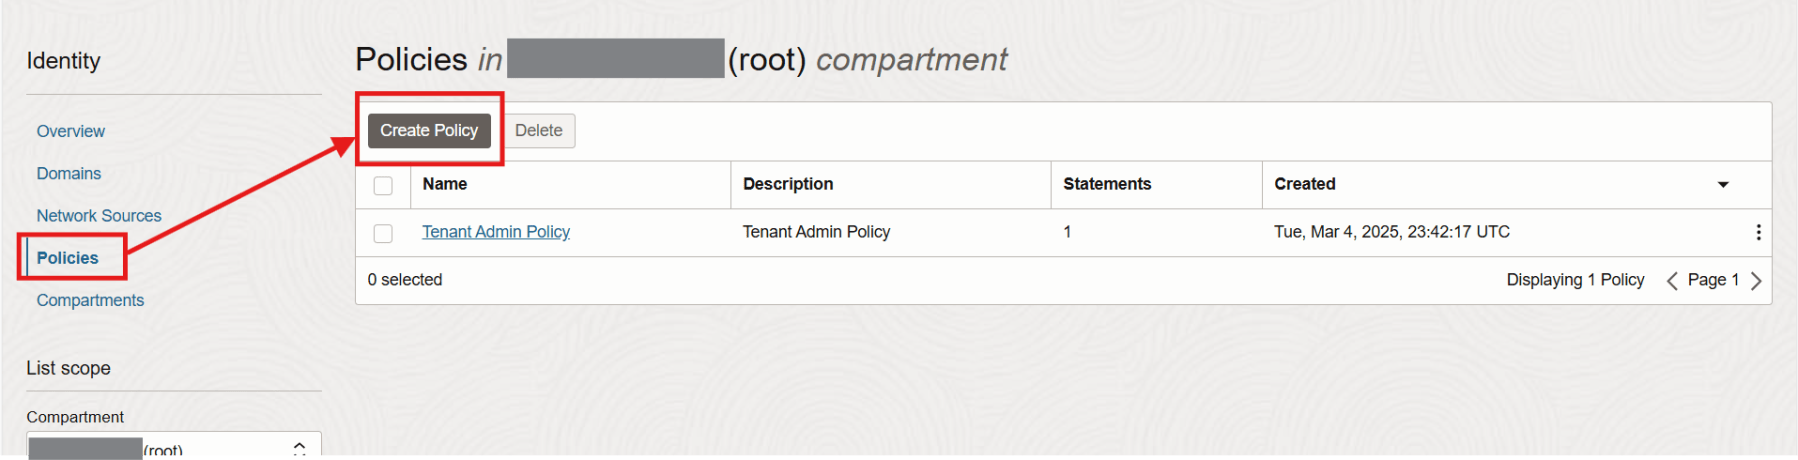
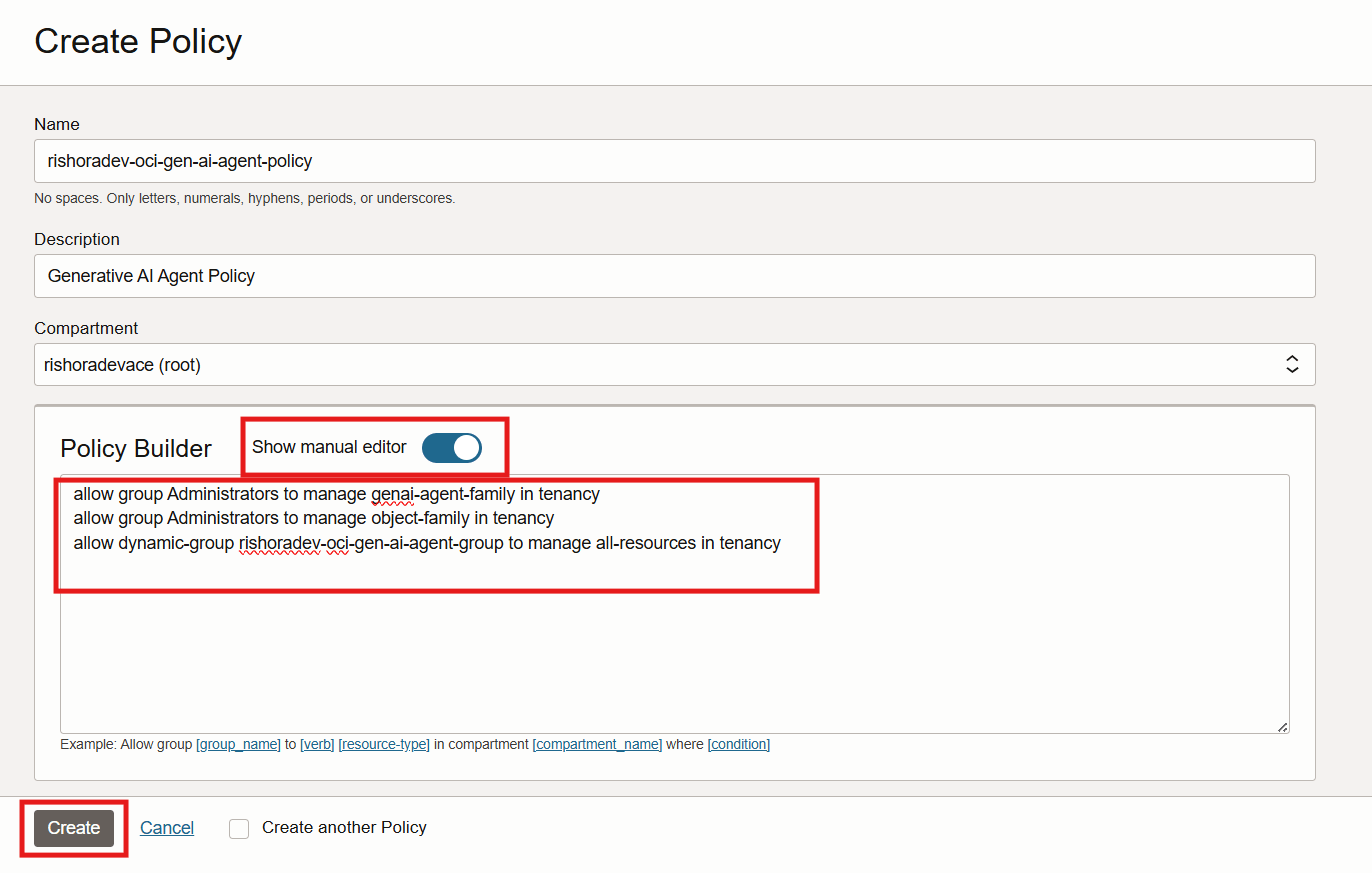
In the Create Policy page, enter a valid Name and Description for the policy.
Under Policy Builder, enable Show manual editor. Now copy and paste the following policy statements in the Policy editor.
allow group <your-user-group-name> to manage genai-agent-family in tenancy
allow group <your-user-group-name> to manage object-family in tenancy
allow dynamic-group <dynamic-group-name> to manage all-resources in tenancy
Replace <your-user-group-name> with the user group that your user is associated with. In this case I replace with Administrators. Also replace <dynamic-group-name> with the dynamic group you created above, which in my case is rishoradev-oci-gen-ai-agent-group.
allow group Administrators to manage genai-agent-family in tenancy
allow group Administrators to manage object-family in tenancy
allow dynamic-group rishoradev-oci-gen-ai-agent-group to manage all-resources in tenancy
Click Create.
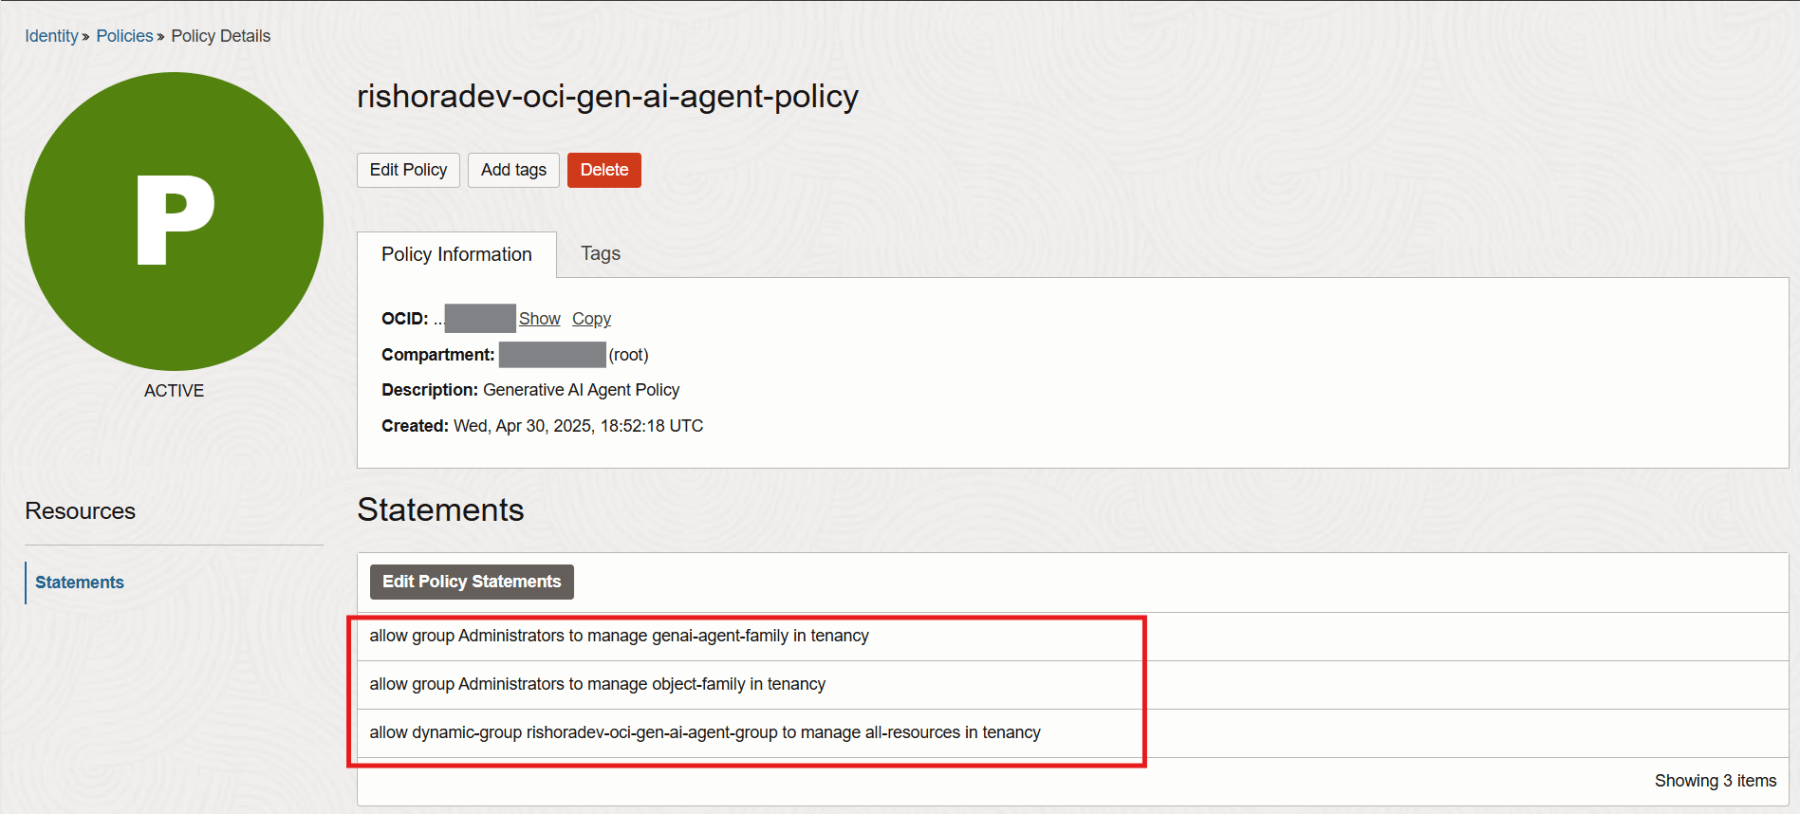
Once the policy is create, the status will change to ACTIVE. You can review or edit the policy statements that you added under Statements.
Verify access to Generative AI Service
Once you complete all the above tasks, change to the region which you used. Now from the navigation menu, click Analytics & AI > AI Services > Generative AI Agents.
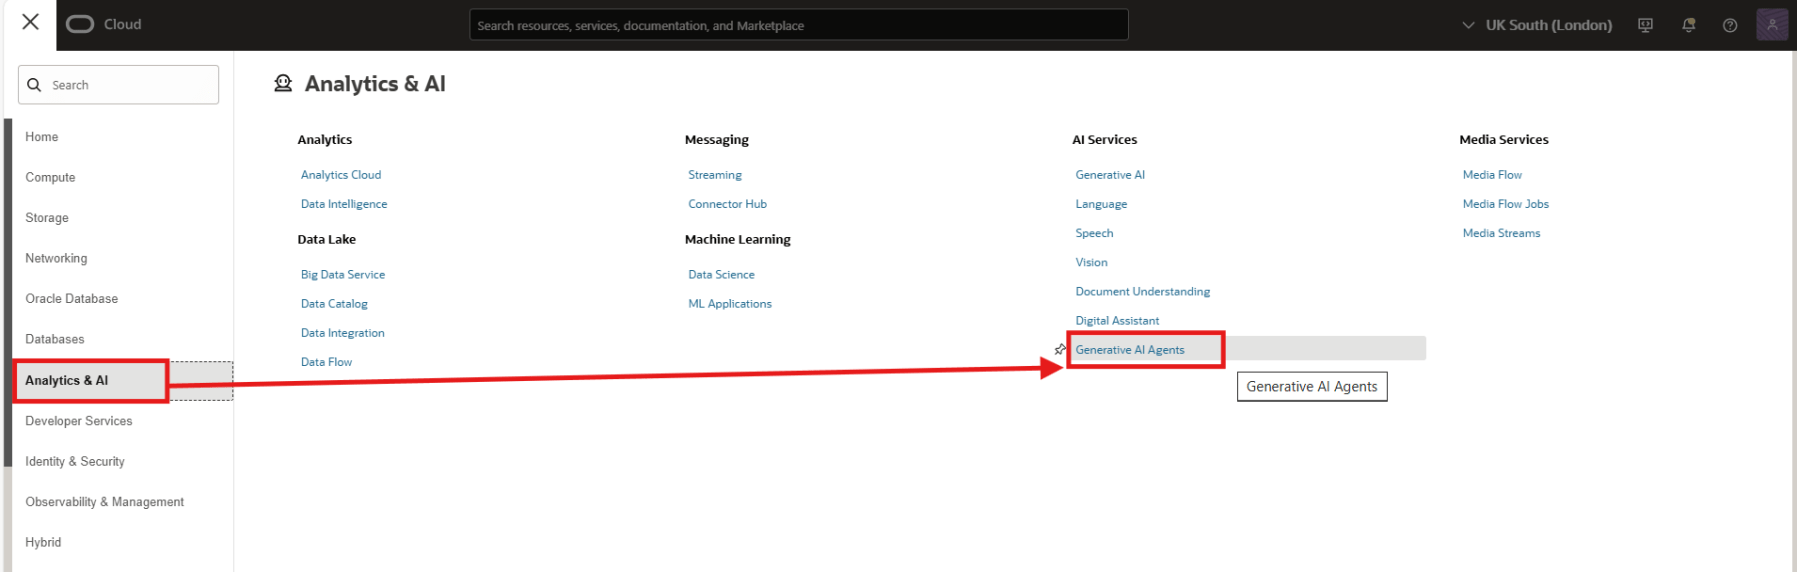
If the Generative AI Agents service does not appear under AI Services, review previous tasks.
Hope this was useful. Happy learning!
References

Pingback: Creating a Knowledge Base for creating Oracle Generative AI RAG Agent | RishOraDev's Oracle Blogs
Pingback: Create Your First Oracle Generative AI RAG Agent | RishOraDev's Oracle Blogs