Get your own Oracle EBS R12.2 Instance On VirtualBox
Evolution of Oracle E-Business Suite VM Virtual Appliance
Have you ever wondered, as an Oracle E-Business Suite Developer or a Functional Consultant, how you can setup your own Oracle E-Business Suite R12 environment, where you can perform all your POCs, which you can’t perform on a client environment, otherwise? Are you an Oracle Database Administrator, wondering where you can perform a test upgrade of your Oracle EBS environment? If yes, then this blog post is for you.
Implementing Oracle E-Business Suite environment, from scratch, can be a challenging task. It requires a lot of resources, in terms of hardware [ disk space, CPU, memory, etc ], and a team of developers, functional consultants, testers and of-course DBAs to configure and implement the environment. The life-cycle of the project can take months and involve a lot of complexities.
Well, Oracle has a solution to this. Using Oracle’s VirtualBox and Oracle VM Server, you can now configure a test on-premises EBS R12 environment within a few hours. Oracle has released a number of EBS R12 virtual appliances over the years. These appliances are available for download from the Oracle Software Delivery Cloud. You can use these appliances to create Oracle E-Business Suite Vision demo instances on single, unified virtual machines containing both the database tier and the application tier. Some of the available versions of the Oracle E-Business Suite Release 12.2.X is shown in the table below, along with their announcement dates. There is also a Release 12.1.3 VM Virtual Appliance available for download.
| Oracle E-Business Suite Virtual Machine Version | Announcement Date | |
| EBS R12.2.10 | January 14, 2021 | |
| EBS R12.2.9 | October 21, 2019 | |
| EBS R12.2.8 | February 4, 2019 | |
| EBS R12.2.7 | February 20, 2018 | |
| EBS R12.2.6 | May 5, 2017 |
In this blog, I’ll demonstrate the steps involved in getting an Oracle EBS R12.2.9 environment up and running. If you want to setup any other version, the steps are pretty much similar.
Note: This virtual appliance is for on-premises use only. If you’re interested in running Oracle E-Business Suite on Oracle Cloud, see Getting Started with Oracle E-Business Suite on Oracle Cloud (MOS Note 2066260.1) and Oracle E-Business Suite and Oracle Cloud for more information.
EBS Technology Stack Components for Oracle E-Business Suite 12.2.9 VM
The Oracle E-Business Suite 12.2.9 VM virtual appliance delivers the full software stack, including the Oracle Linux 6.10 (64-bit) operating system, Oracle E-Business Suite, and additional required technology components.
The embedded technology components and their versions are listed in the table below
| Technology Component | Version (and associated MOS Doc ID if applicable) |
|---|---|
| RDBMS Oracle Home | 12.1.0.2 |
| Application Code Level | Oracle E-Business Suite 12.2.9 Release Update Pack (MOS Note 2495027.1) R12.AD.C.Delta.11 and R12.TXK.C.Delta.11 (MOS Note 1617461.1) Consolidated technology patches for database and application tier technology stack components (MOS Note 1594274.1) Oracle E-Business Suite Data Removal Tool (DRT) patches (MOS Note 2388237.1) |
| Oracle Forms and Reports | 10.1.2.3 |
| WebLogic Server | 10.3.6.0 |
| Web Tier | 11.1.1.9 |
| JDK | JDK 1.7.0_231 |
| Java Plugin | J2SE 1.7 |
| Critical Patch Update (CPU) | July 2019 (MOS Note 2555452.1) |
So, let’s take a deep dive and see how you can setup your own EBS R12.2.9 environment.
Basic Systems Requirements
- A 64-bit Desktop or Laptop running Oracle Virtual Box.
- At least 6 GB RAM.
- At least 500 GB of disk space.
Steps
1. Download Oracle VM Virtual Appliance for Oracle E-Business Suite 12.2.9
Search for Oracle VM Virtual Appliance for Oracle E-Business Suite 12.2.9 from the Oracle Software Delivery Cloud, select Linux x86 64 bit as the Platform and click on Continue.

Read and Accept Oracle License Agreement and click on Continue.

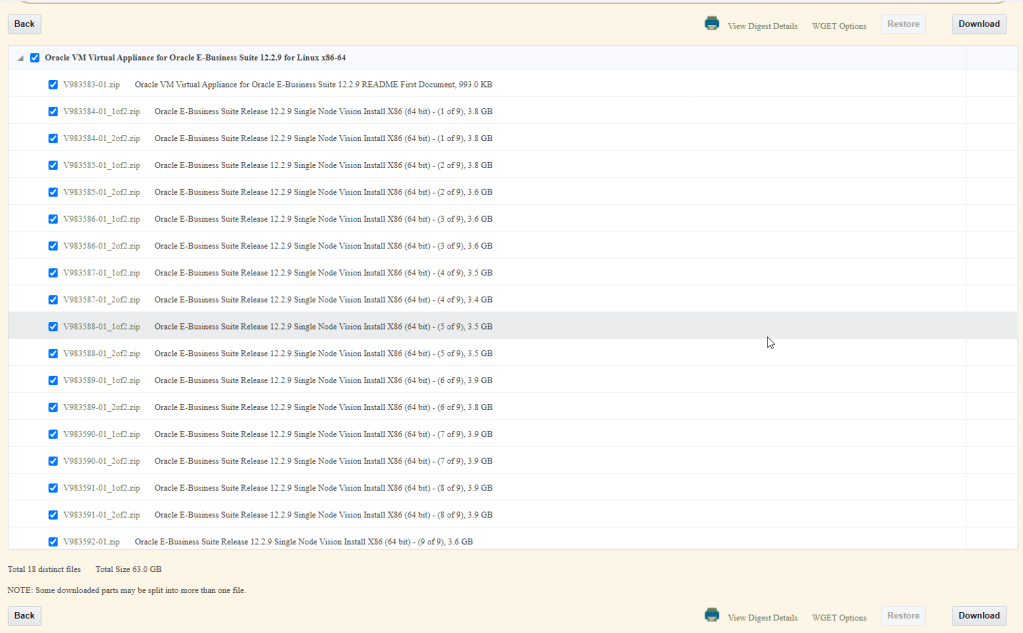
The file download window opens. Oracle VM Virtual Appliance for Oracle E-Business Suite 12.2.9 is shipped through 18 different zipped files ( 63.0 GB ). Click on Download. This process may take a while, depending on your internet speed.

2. Unzip and Merge the Unzipped files.
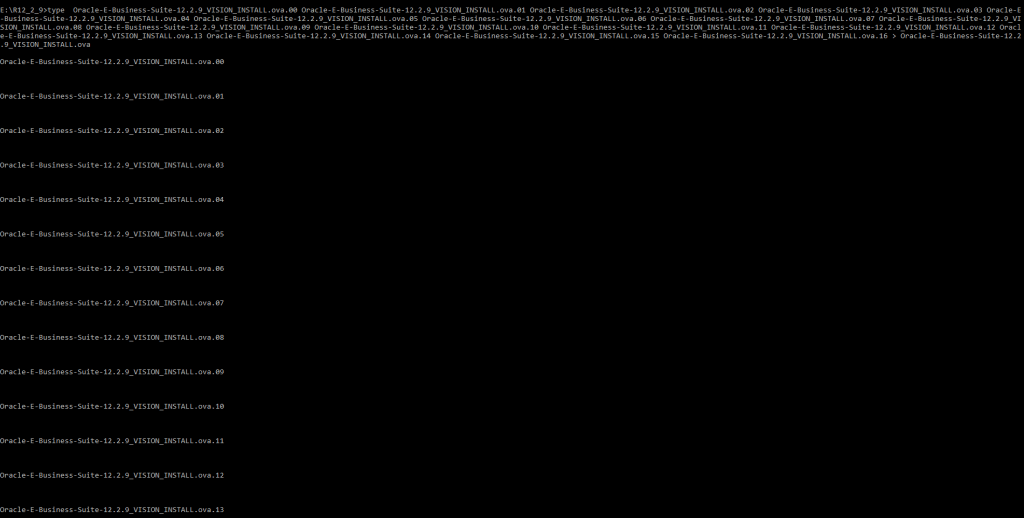
2.1. Unzip the files: Once all the files are downloaded, the next step is to Unzip all these files in a single folder. This would require an additional storage space of around 70 GB. It is recommended that you use 7-zip to unzip the files. This is because using Winzip sometimes causes the files to get corrupted, because of the file size. Once unzipped, these are the list of OVA part files that you will see in the folder.

2.2. Merge or Concatenate the Unzipped files: The next step is to merge the OVA part files into a single .OVA file. In order to do that, open up a command prompt, navigate to folder containing the OVA part files, and copy and paste the following command.
type Oracle-E-Business-Suite-12.2.9_VISION_INSTALL.ova.00 Oracle-E-Business-Suite-12.2.9_VISION_INSTALL.ova.01 Oracle-E-Business-Suite-12.2.9_VISION_INSTALL.ova.02 Oracle-E-Business-Suite-12.2.9_VISION_INSTALL.ova.03 Oracle-E-Business-Suite-12.2.9_VISION_INSTALL.ova.04 Oracle-E-Business-Suite-12.2.9_VISION_INSTALL.ova.05 Oracle-E-Business-Suite-12.2.9_VISION_INSTALL.ova.06 Oracle-E-Business-Suite-12.2.9_VISION_INSTALL.ova.07 Oracle-E-Business-Suite-12.2.9_VISION_INSTALL.ova.08 Oracle-E-Business-Suite-12.2.9_VISION_INSTALL.ova.09 Oracle-E-Business-Suite-12.2.9_VISION_INSTALL.ova.10 Oracle-E-Business-Suite-12.2.9_VISION_INSTALL.ova.11 Oracle-E-Business-Suite-12.2.9_VISION_INSTALL.ova.12 Oracle-E-Business-Suite-12.2.9_VISION_INSTALL.ova.13 Oracle-E-Business-Suite-12.2.9_VISION_INSTALL.ova.14 Oracle-E-Business-Suite-12.2.9_VISION_INSTALL.ova.15 Oracle-E-Business-Suite-12.2.9_VISION_INSTALL.ova.16 > Oracle-E-Business-Suite-12.2.9_VISION_INSTALL.ova
Once you type this command and hit enter, the merge process is kicked off. The process takes around 45-60 mins or more, based on your CPU speed and RAM.
When the merge process is complete, a single .OVA file will be generated. At this point, the OVA part files can be deleted to free up hard drive space.

3. Import VM Appliance to Virtual Box and environment setup.
3.1. Import the VM Appliance to Virtual Box: Open Virtual Box and click on File > Import Appliance.

Click on Expert mode and edit the Virtual Disk Image path to point to a location with at least 300 GB of disk space. If there is not enough space, then the process will abort.
Locate and select the source file system ( the .ova file which was created after the merge ).
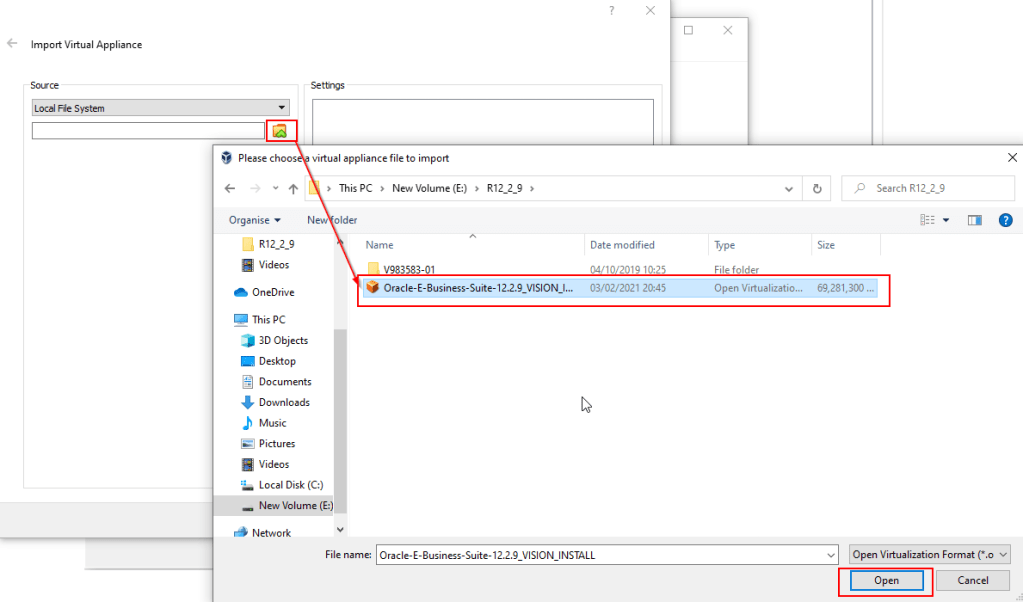
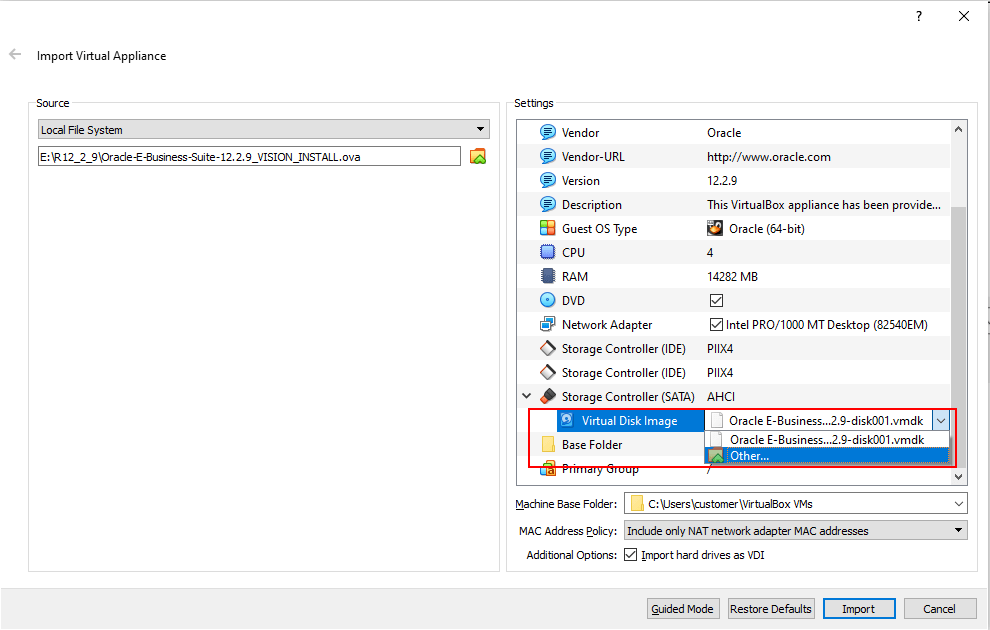
Click on Import.
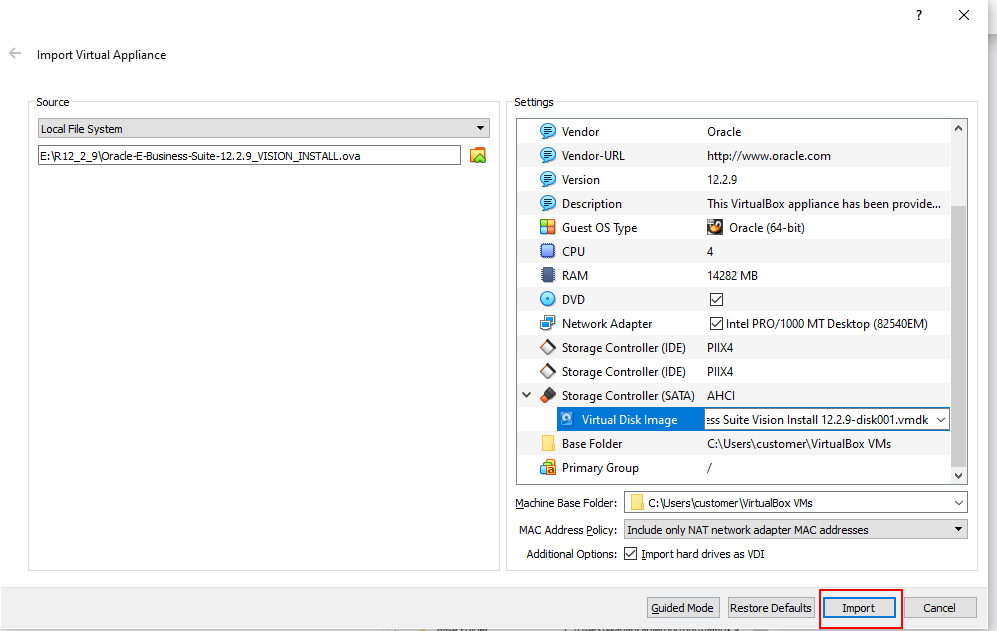
This kicks off the process to import the virtual disk.

When the import process completes, the virtual machine will be listed in the Virtual Box Manager.

3.2. Configuring the Virtual Machine.
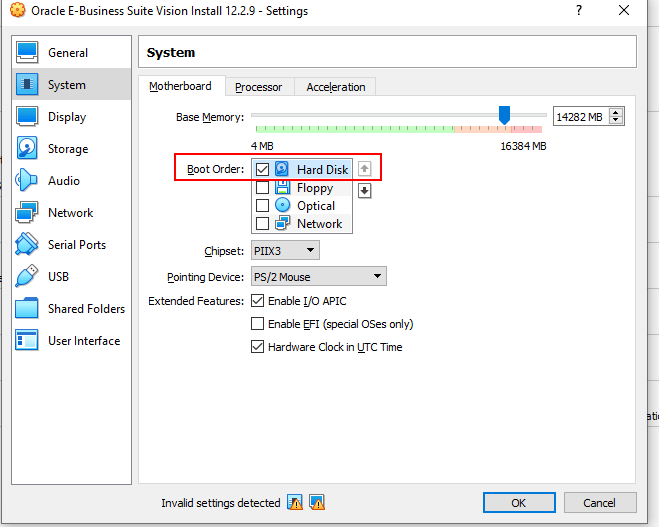
Select the newly imported Virtual Appliance and click on Settings.

The settings window pops up. Click on System. For Boot Order settings in the Motherboard tab, move Hard Disk to the top and un-check Floppy and Optical.
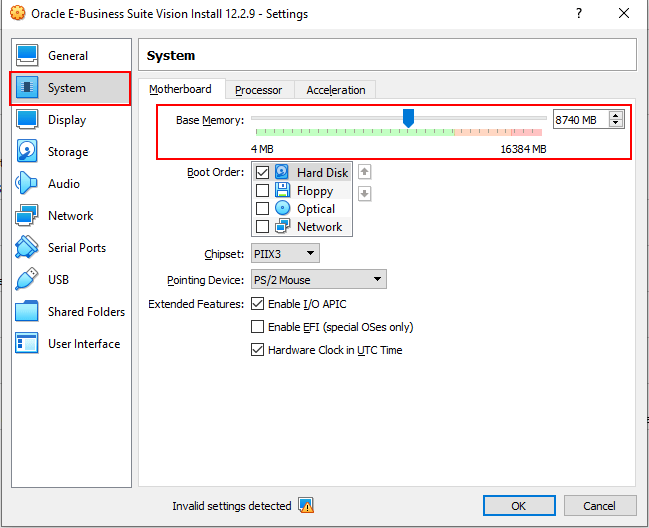
Adjust Base Memory.
Navigate to the Processor tab.

Navigate to the Display settings and go to the Remote Display tab, un-check the Enable Server checkbox.

Navigate to the Recording tab and un-check the Enable Recording checkbox.

Navigate to the Network settings and select Host-Only Adapter. This will enable SSH client and the browser to access the Appliance.

Note: This post assumes that you are configuring an on-premises EBS R12 environment. If you want to integrate your EBS Server to applications hosted on different servers, you have to chose a different Network Adapter. More on different Network Adapters for VirtualBox can be found here.
3.3. Starting the Virtual Machine.
Click on Start.
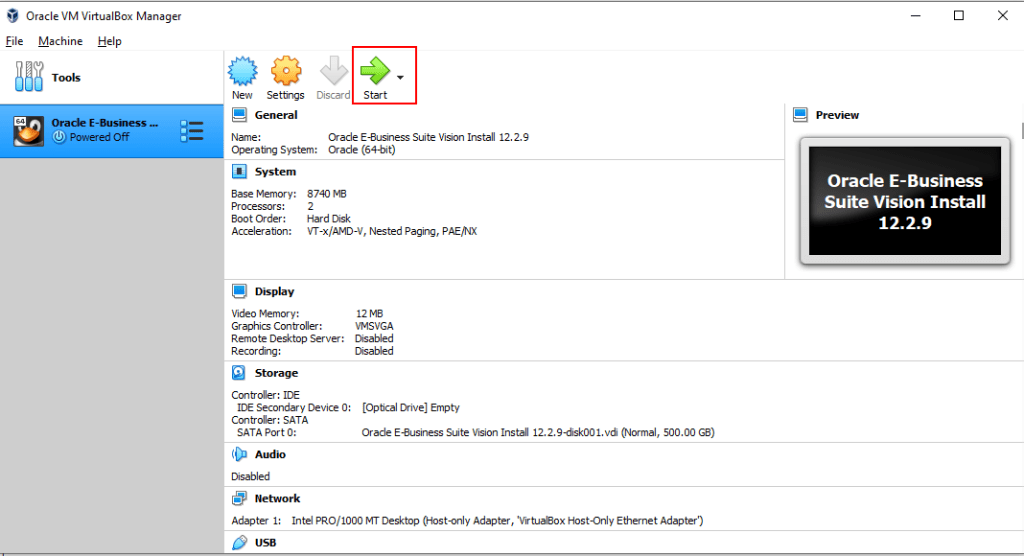
A red progress bar is displayed at the bottom of the page. At the end of the boot process, the login prompt is displayed.
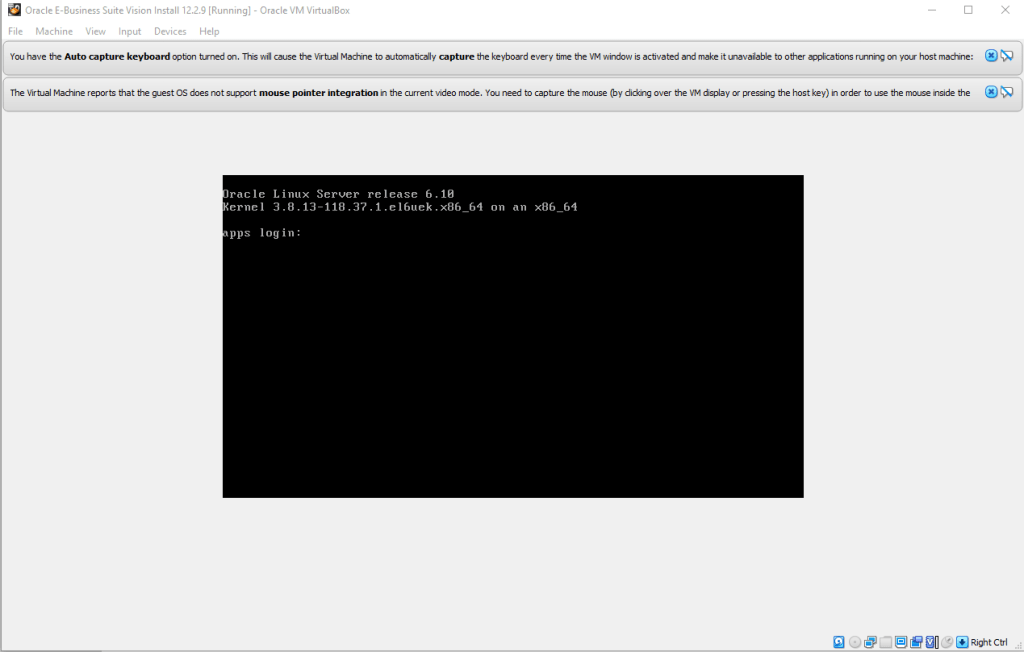
3.4. Resetting passwords.
The next step is to reset the passwords for root, oracle and applmgr, when prompted.
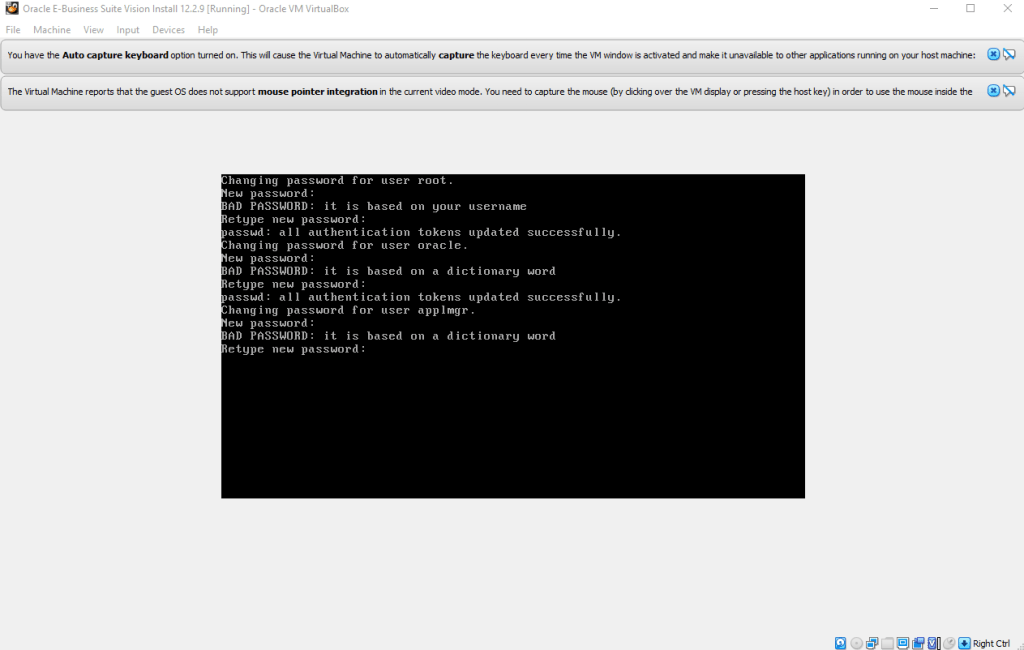
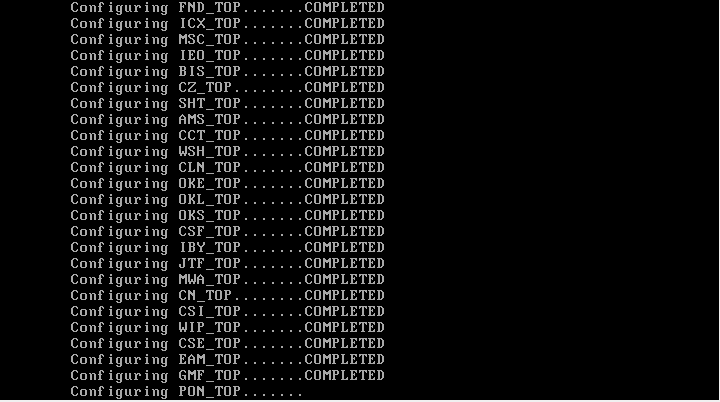
This will kick off the post installation processing.
All <PRODUCT>_TOP(s) are installed. This process may take a while.

3.5. VISION Application Installation.
At the end of the post-installation process, the system prompts whether you want the VISION Demo instance to be configured. Enter VISION and hit Enter.

Once the VISION Demo Instance is configured, issue the ifconfig command. Note down the host.
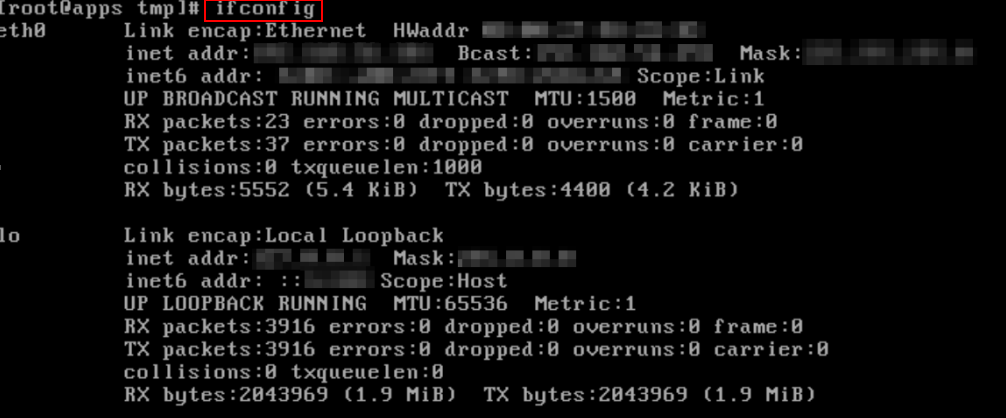
Also issue the hostname command and note down the hostname.

3.6. Starting up the services
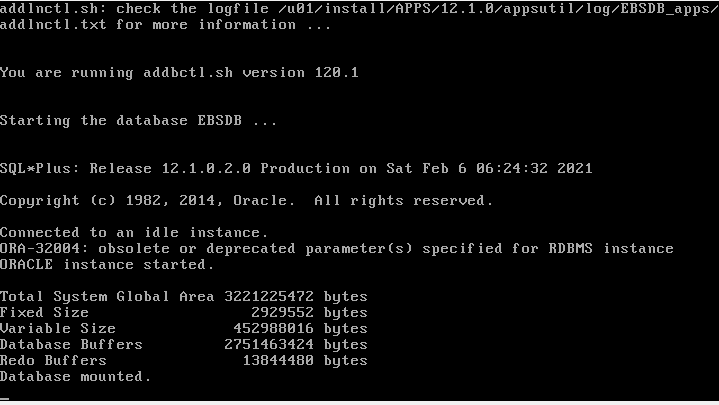
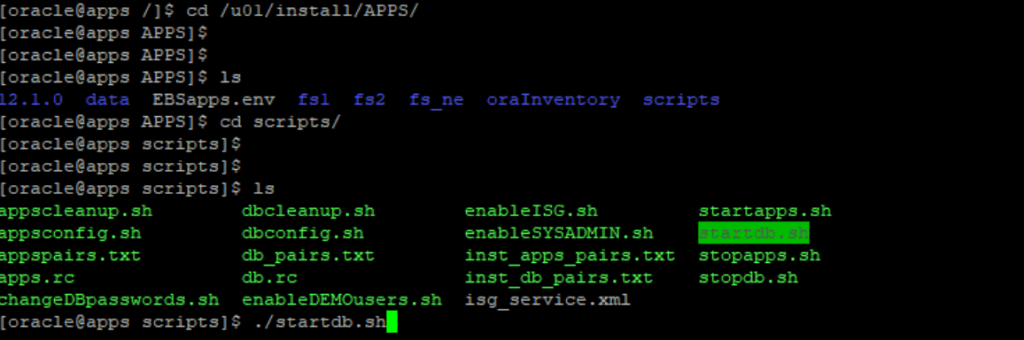
At this point, the environment is already configured. Now you need to start up the services for both database and application tiers. For doing this you can use putty and login to the environment using the oracle user.

Then navigate to the directory /u01/install/APPS/scripts/ and execute the shell script startdb.sh, using the command ./startdb.sh
This will start the database tier services.
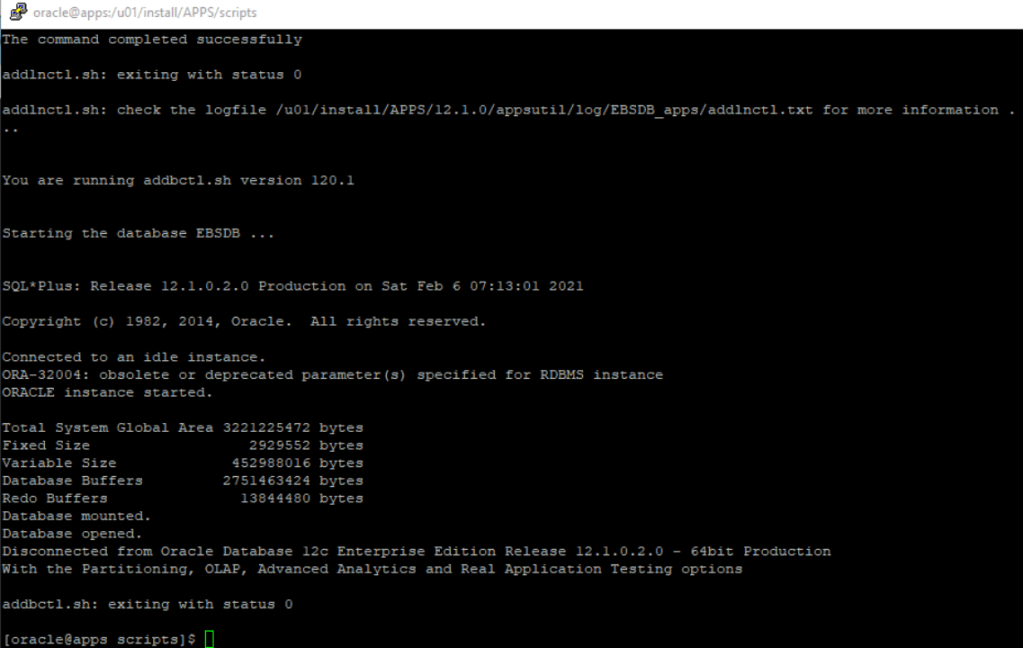
With the database services up and running, start the application tier services by executing the startapps.sh script.

3.7. Changing host file in your computer/laptop
With both the DB tier and APPS tier up and running, the environment is ready to be accessed. You just need to amend the hosts file in your computer, so that you can access the environment through the browser. Hence, in your laptop/computer, locate the hosts file and add the IP address of your newly configured environment and hostname. On Windows machines, this file is present in C:\Windows\System32\drivers\etc directory.

Congratulations!!! You are now all set to login to your newly configured Oracle E-Business Suite R12.2.9 environment. Open any browser ( preferably Internet Explorer ) and type in
http://apps.example.com:8000/OA_HTML/AppsLogin
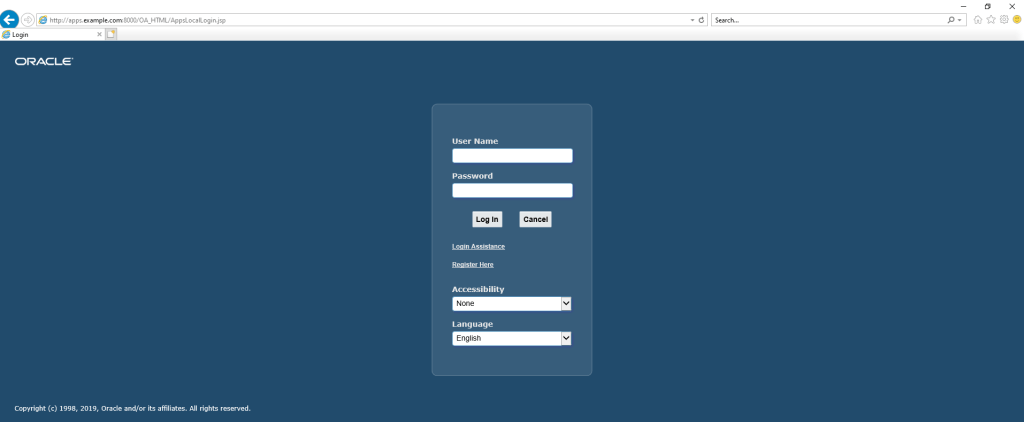
The first login should be done through SYSADMIN user. If you need to change the SYSADMIN user password, you can change it through the enableSYSADMIN.sh script. And if you need to change any of the DEMO users, then use the enableDEMOusers.sh script.

Once you login, try to open a form. Voila!!!

I hope you find this post helpful. If you do like this post, please let me know in the comments section below. In case you get stuck or have any queries with the steps, please feel free to reach out and I’ll try my best to get back to you as soon as possible.
Accessing the Application Tier using Putty
Open a Putty session, provide the IP address of the newly configured environment and ssh port [default is 22] and connect.

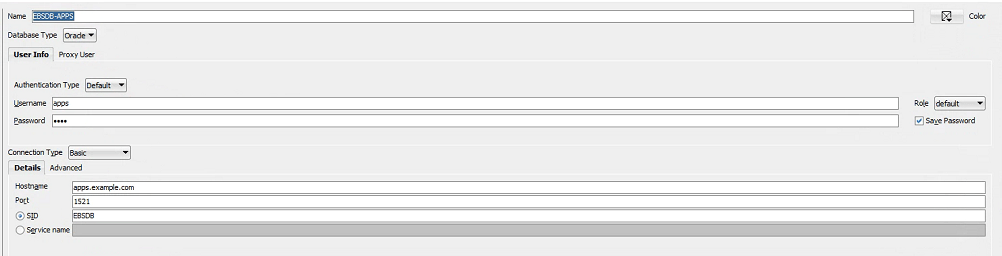
Connecting to EBS Database from SQL Developer installed on the host
Open SQL Developer, provide the hostname [apps.example.com], port [1521], and SID [EBSDB], username [ APPS ] and password [ default password is ‘apps’].
References
- Oracle VM Virtual Appliance for Oracle E-Business Suite Deployment Guide, Release 12.2.9 (MOS Note 2580936.1)
- Oracle VM Documentation Library
- Oracle VM VirtualBox
- Hardware Certification List for Oracle Linux and Oracle VM Hardware Certification List for Oracle Linux and Oracle VM
- Oracle E-Business Suite Release 12.2 Information Center (MOS Note1581299.1)
Related Articles
- EBS 12.2.9 VM Virtual Appliance for On-Premise Now Available
- EBS 12.2.8 VM Virtual Appliance Now Available
- EBS Release 12.2.7 VM Virtual Appliance Now Available
- Oracle VM Virtual Appliance for E-Business Suite 12.2.6 Now Available
- Oracle EBS R12.2.X Instance On VirtualBox

Rishin – This is quite detailed, informative and comprehensive. Well done. This helps consultants looking to build their own sandbox to play with and explore newer options.
LikeLike
Thanks Srihari…
LikeLike
Hi,
Thank you for your guide installation EBS with VirtualBox. But I have 2 questions:
– How to acces and explore files EBS VM with Putty ?
– How to access Database EBS with SQL Developer on windows.
Thanks.
Abder
LikeLike
Hi Adber,
I have amended the details at the end of the post. Hope you find it useful.
Regards,
Rishin
LikeLike
Hi Rishin,
In PuTTy, I have error Acces denied with account apps (password apps)
In SQL Developer, I have this error:
Statut : échec -Echec du test : Erreur d’E/S: The Network Adapter could not establish the connection (CONNECTION_ID=oMVBP9qxTTGJtndUVe9bCQ==)
Please help me.
Thanks,
Abder
LikeLike
Hi Rishin,
Problem is solved with SQL Developer. Thanks.
LikeLike
Could also share me WINSP details
LikeLike
Hi,
It seems to me that there is a problem with account apps because not working in PuTTy.
LikeLike
Hi, I am unable to connect to APPS schema in SQL Developer, could you please help me. I am able to connect through putty and can perform all actions but in SQL Developer I am unable to connect.
LikeLike
Hi Anirudh,
Can you please coonect using the root user, and execute the following command. Please let me know if this helps:
iptables -I INPUT -p tcp -d port 1521 -j ACCEPT
Regards,
Rishin
LikeLike
Hi Rishin, Thank you for the response!! when I am trying to execute the command using root user it says – Bad argument ‘1521’ . Could you please guide me
LikeLike
Thank you, it worked dint realized that there are 2 “-” for d port. I am able to connect to APPS schema in SQL developer now.
LikeLike
Hi Anirudh,
Glad that it helped and you were able to resolve the issue.
Regards,
Rishin
LikeLike
It is worked. Thank you.
LikeLike
Hi Rishin, I am facing an issue with the form’s opening. When I logged in and tried to open the form in IExplorer it doesn’t do any action just stayed on the logged-in page. I tried in Mozilla Explorer in that it gives the following error “Failure of Web Server bridge: No backend server available for connection: timed out after 10 seconds or idempotent set to OFF or method not idempotent.”. Could you please guide me? Thanks!!!
LikeLike
Thanks Rishin for your efforts in outlining detailed steps to get EBS up and running on a laptop. This is was extremely helpful. I would like to know if you know of a similar setup to integrate Jdeveloper/OA Framework with EBS R12.
LikeLike
Hi Rishi, thanks for this very detailed explanation, it is extremely helpful to me. Would you mind helping with the forms as I am getting the below.
In order to access this application, you must install the J2SE Plugin version 1.8.0_221. To install this plugin, click here to download the oaj2se.exe executable. Once the download is complete, double-click the oaj2se.exe file to install the plugin. You will be prompted to restart your browser when the installation is complete.
LikeLike
Can you also give details regarding the shutting down of the VM properly? I did that by doing stopapps.sh and then stopdb.sh and then finally shutdown the machine in VM. Now when I am starting again from VM I am getting the error while giving ./startdb.sh
TNS-12543: TNS:address already in use
TNS=12560: TNS:protocol adapter error
TNS-00512: Address already in use
Linux Error: 98 : Address aleady in use
LikeLike
Maybe you got a new IP-Adresse after the reboot and you need to edit/update hosts file with your current IP-Adress.
Afterwards shutdown APPS and DB.
Aftewards start DB and APPS and it should work.
Kind regards
Phil
LikeLike
I have same error, I can’t find how to fix it. Could anyone help?
LikeLike
I’m also facing the same problem. Can you please help with this
LikeLike
Thanks it is very knowledgeful document. i have installed succesfully on my machine. However, when i retrying to open application i am getting this
Failure of Web Server bridge: No backend server available for connection: timed out after 10 seconds or idempotent set to OFF or method not idempotent.
please assist.
LikeLike
Thanks Rishi for the detailed steps, very easy to follow.
Below is an update:
To connect to the DB using SQL Developer, below is the command
iptables -I INPUT -p tcp –dport 1521 -j ACCEPT
LikeLike
abbas, i tried it as well but no luck.
can you let me know what network config did you use e.g. NAT or bridge. I tried both no luck with SQL Dev. I had done it before without opening the firewall.
After the command is issues; i assume you did this in root access. did you shutdown and restart the firewall?
LikeLike
Hi Rishin,
How to connect to the DB on a Mac machine? Could you let me know please? and would we still need to setup a putty equivalent session on a Mac to connect to the DB as from what I understand the putty session is for connecting to the app tier.
Thanks
LikeLike
Hi Rishin
Thank you very much for detail drilling down. It is helping and keep helping a lot of people who are struggling to get your hands running on Oracle Apps.
I am able to connect DB through putty and sql developer but struggling with internet browser due to below error.
I would really appreciate if someone could help me out ?
Failure of Web Server bridge:
No backend server available for connection: timed out after 10 seconds or idempotent set to OFF or method not idempotent.
LikeLike
Hi Rishin
It take a few min for all the services to show up. I had the same issues. run startapps once more and give it 10min it will showup.
LikeLike
Hi
I’m unable to connect database through SQL Developer.Its prompting ‘connection reset’ and sometimes Network Establish connection error. Please give me some detail steps or guide me. Thanks
LikeLike
Reblogged this on Bed Time Stories for Us and commented:
One of the best articles you can find online for setting up your own Oracle EBS R12 12.2.x Virtual Appliance. Enjoy
LikeLike
check path, had same thing happen
LikeLike
Can I install VISION after I finish everything ? (I forgot to install it the first time)
LikeLike
Steps to install Java Web Start ?
LikeLike
While importing to Virtual box getting argument error
e_invalidarg 0x80070057
LikeLike
Hey,
thanks for this document!
It was very useful!
Have you any idea how to change the Hostname?
Thanks in Advance
Kind regards
Phil
LikeLike
Hi Rishin,
Question1: can i use this VM as Production, is it stable , can i patch it if needed ?
Question2: How to login to applicaion as french language (not english) ?
Thanks you
Chaker
LikeLike
I have installed the Oracle R12.2.9 in my system and started the services.
I am able to login through Putty, SQL developer and WinSCP. but I am unable to open the link in front end even after adding the details in host file directory.
Please help on this.
LikeLike
Hi i am looking for the config files , i forgot my passwords
LikeLike
after installing , can i do the ebs rapid clone ???
LikeLike
Hi
Did anyone get issue for FRM-92050 with response code 400 after installing the VM version of EBS?
If anyone face the issue, can someone please throw some lights on this?
Many Thanks
Best Regards
Wira
LikeLike
hi Rishi. I did the same steps. had issues with getting sqldeveloper to connect. I did the iptables step you noted. Do you need to restart any service to let it to take effect e.g. restart the firewall on the VM – i tried it as well did not help.
For the network adapter – i tried both your method and also added the bridge which i successfully was able to connect with on older R12.2.7vm image.
Everything is working correctly just stuck on getting this db connection.
thanks.
Saj
LikeLike
Hello sir, I have accidentally pressed enter where I had to write: VISION at the end of installation to configure the VISION instance. How can I get that prompt back?
LikeLike
Thanks for this effort, it went smoothly until I got to login, to note that on 12.2.12 default password might not be as expected so you have to run shell script enableDEMOuser.sh found under top scripts directory, now working on batch script so no need for start routine. Thanks again, a real life saver, was using some terrible slow vm installs, having it on my own local machine makes all the difference.
LikeLike
Thanks for the work on this post, much better having a local install running on desktop than a remote vm that run like flat tire. Only thing I had to do outside of your guidance on 12.2.12 was reset passwords on demo user running the enableDEMOusers.sh, running with Edge in IE mode. had to tweak settings on Edge, e.g. block popups, etc. , now working on windows batch to do all the vm and ebs startup routine using putty. thanks again.
LikeLike
Hi,
Does this method work on Azure VM Windows 10 Virtual Machine ? I tried to install this on a Windows 10 (8 CPUs, 32GB RAM) through VirtualBox and see a few errors and running for a long time. Anyone has experience doing this on a Azure VM ?
Thanks,
Raj K
LikeLike
Hello every body, firt thank’s a lot for this helpful tutorial, i have an issue on connecting to EBS R12.2.12 Database from SQL Developer installed on the host
that are what i put on feild’s sql developer :
name : EBSDBR12
user : APPS
password : apps
hostname : apps.example.com
port : 1521
SID : EBSDB
the error message shown by Sql developer is
“Status: Failed – Test Failed: I/O Error: An existing connection had to be closed by the remote host, connect lapse 1 ms., Authentication lapse 0 ms.”
please can any one helps me
LikeLike
lo every body, firt thank’s a lot for this helpful tutorial, i have an issue on connecting to EBS R12.2.12 Database from SQL Developer installed on the host
that are what i put on feild’s sql developer :
name : EBSDBR12
user : APPS
password : apps
hostname : apps.example.com
port : 1521
SID : EBSDB
the error message shown by Sql developer is
“Status: Failed – Test Failed: I/O Error: An existing connection had to be closed by the remote host, connect lapse 1 ms., Authentication lapse 0 ms.”
please can any one helps me
LikeLike
Pingback: Oracle EBS R12 Vision Instance – Duh! Microsoft did it again
Failure of Web Server bridge:
No backend server available for connection: timed out after 10 seconds or idempotent set to OFF or method not idempotent.
LikeLike
While connecting to SQL developer, getting the below errors. Please help.
An error was encountered performing the requested operation:
IO Error: Got minus one from a read call, connect lapse 0 ms., Authentication lapse 0 ms.
Vendor code 17002
An error was encountered performing the requested operation:
IO Error: An existing connection was forcibly closed by the remote host, connect lapse 1 ms., Authentication lapse 0 ms.
Vendor code 17002
Used the command below for IPTables entry.
iptables -I INPUT -p tcp –dport 1521 -j ACCEPT
LikeLike