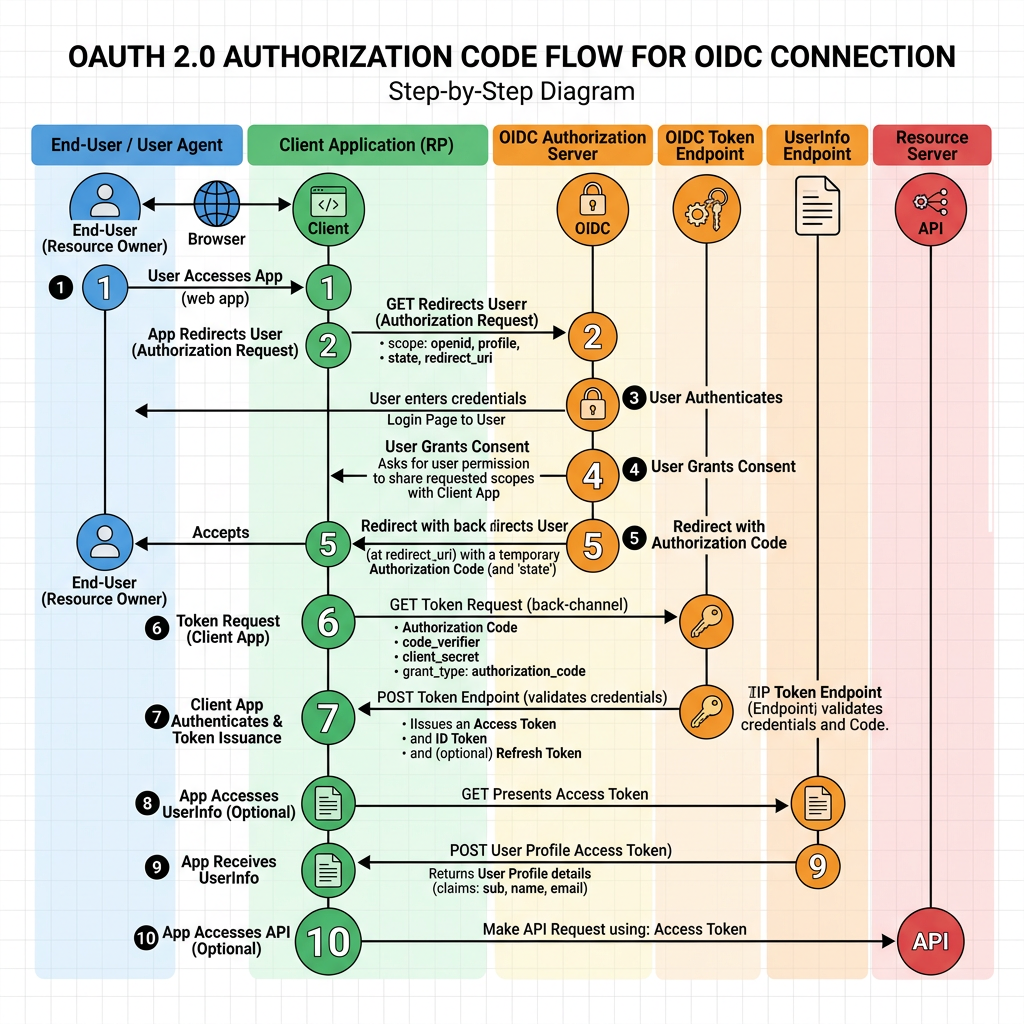
Modern integrations are no longer just about connecting systems – they are about doing so securely, reliably and in a way that aligns with enterprise identity and access management standards. As organizations increasingly expose APIs and integration endpoints through cloud platforms, selecting the right OAuth 2.0 grant type becomes a critical design decision.
In my previous blog, “Create a Confidential Application to Connect to OIC using Client Credential Grant Type”, I walked through how to establish secure machine-to-machine communication using the Client Credentials flow. That approach is ideal when integrations operate without user interaction – for example, backend services, scheduled jobs, or server-to-server API calls where an application authenticates using its own identity.
However, not every integration scenario is system-driven. Many enterprise use cases require actions to be performed on behalf of a user, where user consent, delegated access and identity context matter. This is where the Authorization Code Grant Type becomes essential.
The Authorization Code flow is designed for confidential applications that need secure, user-based authentication without exposing credentials or tokens to unauthorized parties. By separating user authentication from token issuance, it provides stronger security controls, supports consent-based access and enables applications to access protected resources while preserving the user’s identity context.
From a business perspective, implementing the correct OAuth flow helps organizations strengthen API security, meet compliance expectations, enforce least-privilege access, and reduce risks associated with credential misuse. Using the wrong grant type can introduce unnecessary exposure or operational limitations.
In this blog, we will focus on creating a Confidential Application to connect to Oracle Integration Cloud (OIC) using the Authorization Code Grant Type. We will walk through the configuration steps required to enable secure, user-authorized connectivity with OIC.
So let’s crack on!!!
Step-by-step process
Login to OCI console and navigate to Identity & Security > Domains.

Make sure to select the correct compartment. Navigate to your chosen Domain. In this case, we will chose the Default domain.

Navigate to the Integrated applications tab. Click Add applications.

From the application types, we will choose Confidential Application. This is help us to authenticate users using OAuth 2.0. Confidential Application facilitates the protection of OAuth client ID and client secret

Type a name for the Confidential Application. Optionally add a Description.

Under URLs, all fields and URLs are optional. For this demonstration, they will be left blank. However, in a production environment, ensure that all required URLs are configured appropriately based on your specific requirements.

For this demo, I’ll leave the Display Settings and Authentication and Authorization sections as default.

Click Submit to create the Confidential Application. Once the application is created, we now need to complete the OAuth configuration. To do that, navigate to the OAuth configuration tab, and click on Edit OAuth configuration.

Since we are setting up a client configuration, select Configure this application as a client now. This will expand the configuration panel. While multiple grant types can be configured for an application, this guide focuses specifically on the Authorization Code flow. Select Authorization Code and Refresh token.

Since this is a basic flow, I will select Anywhere under Client IP address. However, when you are setting up within your organization, you must select Restrict by network perimeter to implement a tighter security.

Enter a Redirect URL using the format below. Replace <your-iam-domain> with your IDCS/IAM domain URL. If you’re unsure where to find it, I’ve covered the steps to retrieve your IDCS URL in the Postman configuration section later in this blog.
https://<your-iam-domain>/icsapis/agent/oauth/callback

Under Add Resources, enable the slider and click on Add Scope for the confidential application.

Search for your OIC instance and click on Add.

You will see that the scopes are now added to your confidential application. Make a note of the

Make a note of the consumer::all scope. This will be required when you are generating the Access token.

Click Next and then Finish.

Now the Confidential Application is all configured. Activate it.

A dialogue box will pop up. Click on Activate application.

Navigate to the Oracle cloud services tab for your domain and select

Navigate to Application Roles. Assign ServiceInvoker role and ServiceDeveloper role to the confidential client Application using Manage Applications. This allows the application to invoke OIC integrations. At minimum, the ServiceInvoker role is required. Additional roles may be needed depending on the integration.

Select the roles and click on Manage applications.

Click Assign.

Take a note of the Client ID and Client secret. You will need it for generating the access token.

That completes configuring the Confidential application. Now let us test the connection
Test OIC REST API Call using Postman
For the demonstration purposes, we will be using Postman to first Generate our access token and then use this access token to invoke our OIC REST API.
Generate Access Token in Postman
To generate the access token within postman, we will use the information that we have already captured. I have furnished these in the tables below.
| Security Policy | OAuth Authorization Code |
| Auth Type | OAuth 2.0 |
| Token Name | OICTokenAuthCode |
| Grant type | Authorization Code |
| Callback URL | https://<oic_instance>/icsapis/agent/oauth/callback |
| Auth URL | https://<your-iam-domain>.identity.oraclecloud.com /oauth2/v1/authorize |
| Access Token URL | https://<your-iam-domain>.identity.oraclecloud.com/oauth2/v1/token |
| Client ID | <Client ID> |
| Client Secret | <Client Secret> |
| Scope | https://XXXX.integration.uk-london-1.ocp.oraclecloud.com:443urn:opc:resource:consumer::all |
| Client Authentication | Send as Basic Auth Header |
| Refresh Token URL | https:// <your-iam-domain>.identity.oraclecloud.com/oauth2/v2/token |
Note:
a. To find your <your-iam-domain>, login to your OCI console and navigate to Identity & Security > Domains.

b. To find <oic_instance>, navigate to Developer Service > Integration. Choose the correct compartment. Select your Oracle Integration Cloud instance. Copy the Runtime URL under Links.

Once you have the necessary information, as specified in the table above, we need to use the information to generate a new token under the Authorization tab in Postman, as shown below. Populate the information and click Get New Access Token.

If the configuration is set up correctly, the Oracle login page will be displayed. Enter your login credentials to authenticate.

Once your credentials are successfully validated, an “Authentication Complete” message will appear. Click Proceed to continue.

You can see that the access token has been generated successfully. Click on Use Token.

Invoking OIC REST API.
For invoking your OIC REST API, enter the endpoint URL for your OIC integration. If you don’t know where to locate it, go to the Run section of your integration in Oracle Integration Cloud and click Endpoint Metadata to retrieve the details.

Select the correct request type for your OIC integration type. I’m using the integration which I demonstrated in this blog, which had the request type – POST.
Add your URL endpoint, select the token that you created above and click on Send.

You can check the status of the REST API call from the Postman console. If the call is successful, the status returned will be HTTP/1.1 200 OK.

Also login to your OIC console and verify the integration invocation from the Instances tab under Observability.

Hope this was useful. Happy learning!
References




Leave a Reply